Showing posts with label cooking with Rich. Show all posts

Thursday, August 07, 2008

Paul Bertolli's Perfect Gnocchi: So Easy, a 2-Year Old Can Do It

When I went on a food book buying spree a few months ago, I picked up Paul Bertolli's outstanding Cooking By Hand, which has been on my radar for quite some time. I had borrowed this book from the library a few years back when I decided to start curing meat at home (there is a chapter dedicated to the craft, which Bertolli has pretty much perfected - but that's a story for another day). Not simply a collection of adapted recipes, this book is more like a compilation of essays, taking the reader deep into the thought process and philosophy of Bertolli's cooking. From pasta, to dessert, even to rediscovery of simple classics (a chapter aptly named "Cleaning the Fresco"), Bertolli provides complex analysis down to the seemingly insignificant minutiae that clearly demonstrate the makeup of a master chef.

The prose could be considered excessive and self-indulgent by some (get to the recipes already!), but that thinking would be missing the point of this book. Besides, the careful descriptions of each detailed step and its overall role in the finished product were tremendously educational, and kept me riveted. Nowhere was this more evident than in his writeup on classic potato gnocchi. I was attracted to this item right away, as it appeared to be one of the simpler preparations in the book, not to mention that I love to eat them. The poetic description of the virtues of this gnocchi recipe was quite compelling.

I feel obligated not to reprint the exact recipe, lest the copyright police stage a raid and lock me up. Get the book from the library, or better yet, buy it. This one dish is worth the price alone. The ingredients are pretty standard - starchy potatoes (like russets), flour, salt, and egg. The real magic, I think, is in the technique to bring these all together.

To prepare the potatoes: Boil the potatoes in their skins until fork tender. Drain and let cool only until you can handle them without burning your hands. Peel and rice them.

While the potatoes are still warm, add flour and egg. Kneed gently into a dough, being careful not to overwork it (don't want to develop too much gluten, okay?). Now the fun part begins.

I have fond memories of gnocchi making parties when I was a kid. And my 2-year old daughter loves to help me out in the kitchen (here she is making me proud by helping me cure some bacon), so it seemed a natural time to draw on here eagerness to help.

Rolling the gnocchi dough - Once the dough is ready, section into smaller pieces and roll into ropes, or "snakes" as my daughter likes to call them. 1/2" diameter is about right.


Cutting the gnocchi rope - Cut each rope into 1" long pieces. Make sure to keep them well floured during this stage. Look at that tiny, flour coated hand. Makes me want to weep.


Texturing the gnocchi - You can use a fancy gnocchi board to do this, but I find it works just fine with a fork, or a cheese grater, or anything else with a coarse texture. Texturing the outside of the gnocchi is not mandatory, but it does help to make a sauce adhere better. Just place a piece on the fork, lightly press your thumb and roll. This creates a little pocket on the inside, and a craggy texture on the outside.


A completed gnocco - Look at the look of concentration from my young sous chef. Impressive.


Elisabeth making a gnocchi "snake" - "I want to do it myself only, daddy!" And I tell you what, she made a darn good one. What can I say - she's got mad skillz.


Gnocchi sauteeing in brown butter - After a quick boil in generously salted water (they're done when they float up to the surface), the gnocchi were drained and tossed in a sautee pan into some brown butter. Not burned butter, but brown butter - important distinction. Sautee until the gnocchi begin to color. You could add sage or some other herbs here if you want. I skipped the green stuff and went straight up this time.


Perfectly cooked gnocchi, with a generous helping of Parmigiano Reggiano - Now that's what I'm talking about! If you've done it right, these morsels will be fluffy and soft. Oh, and they'll taste great too.


These were some of the best gnocchi I have ever made. My wife certainly thought that they were the softest and fluffiest, and I really couldn't disagree. In a word, they were, well, perfect. If you need to solve your gnocchi woes, do yourself a favor and check out Paul Bertolli's Cooking By Hand. After all, if Elisabeth can do it...

Saturday, April 05, 2008

Keller in the Caf - Making The French Laundry's Lobster Macaroni and Cheese at Work

So, I promised a colleague at work a homemade lunch something like a year ago. But between the busyness of work and home, I kept putting it off. As the months (and months, and months...) passed by, I grew tired of getting "the look" every time I ran into this guy, so I decided to finally make due on my promise. I was on the hook big time, so I wanted to blow him away. I needed to come up with something extraordinary - maybe even, something French Laundry-esque.

Chances are that you, like me, probably haven't had the chance to eat at The French Laundry (for those of you living in a cave somewhere, I'll simply say that TFL, under the helm of celebrated chef Thomas Keller, is considered the best restaurant in the US, if not the entire world). For "regular people" like me, missing out on this experience is probably best for the wallet, but yet incredibly disappointing. But all is not lost.

I recently picked up Keller's French Laundry Cookbook, which was published almost 10 years ago (I know, I'm a bit late to the party). The book is an unquestionable masterpiece, a treatise on modern culinary technique and thought. Keller describes and details the food as prepared in the restaurant - no shortcuts. He offers advice to help guide the home chef when things get complicated, but never are things dumbed down. Of course, this means that unless you have a contingent of sous chefs working for you, cooking from the book is generally time consuming and meticulous. And sourcing raw ingredients of the level of quality that these dishes demand can be quite expensive. But in my brief experience with the book, it is absolutely worth it.

Don't just take my word for it, though. One of my favorite reads these days is Carol Blymire's abmitious French Laundry at Home blog, where the self-described "nutjob" (hey, she said it) is blogging her way through this book with the goal of executing and chronicling every single recipe contained within. The impressive thing is that she's not a trained chef - she's just a regular Joe, er, Jane. Recreating French Laundry food at home is something to aspire to, but why stop there? Why not take it all the way to the office cafeteria? I intended to do just that.

This presented quite a logistical challenge. I wanted my food to be first quality - that is, it would have to taste like it was just made, not like leftovers or reheated slop. The thing is, there is limited equipment in my office cafeteria (that I have access to, anyways) for actually making real food. Here's what I had to work with:

1. Microwave
2. Fridge
3. Butter knives
4. Running water

Well, that rules out quite a bit right off the bat. I suppose I could have made something cold, or a sandwich, but that just didn't sound that exciting. Hmmmm... And then I remembered coffee time. Huh? I keep an 8 cup french press in the office for making coffee... with boiling water that I get from the cafeteria! So that means...

5. French press
6. Boiling water

My thoughts kept drifting back to 3 magic words from Keller's book - butter poached lobster - which is featured in several French Laundry preparations. Because it's not exposed to high heat during the poaching process, the muscle fibers do not tighten and sieze up, making the lobster uncommonly tender and soft. With a French press and some hot water, I can essentially poach the lobster on site in the cafeteria. No, not directly in the french press, as you might be thinking. Sous vide, of course! Now which dish to choose...

The most amenable to cafeteria cooking (and, I have to say, most appealing to me in general) was the "Macaroni and Cheese" or, (deep breath now) Butter-Poached Lobster with Creamy Lobster Broth and Mascarpone-Enriched Orzo (exhale - ahhhh). Just kind of, um, rolls off the tongue. Anyways, I figured that the lobster cream and the orzo would nuke just fine, and besides the lobster, there were no other elements that would require heating.

Before we start, let's be realistic about this - there's needs to be substantial prep work done at home to make this possible. But it was indeed assembled and plated in the office cafeteria, much like what would be done in a restaurant. I should point out for all of you book owners and Keller afficionados there are a couple of minor liberties with the dish I chose to take. For one, I wanted to include some type of vegetation, and I happened to find some nice pea sprouts in the grocery store, so I adapted that element from the "Peas and Carrots" dish a couple of pages away. I also left out the Parmigiano crisp. Sue me.

Steep the Lobster, Before - Hello little guy. No animals were hurt in the making of this ... Ah, screw it. Who am I kidding? Nice knowing you! Pour vinegar seasoned boiling water over your lobster off of the heat.


Steep the Lobster, After - The lobster has now been submerged for 2 minutes. This par-cooks the flesh just enough to allow it to release from the shell. Time to get this thing out of there and pull the meat before it cooks too much. Make sure to save the bodies for the stock.


Harvest and Vacuum Pack the Meat - The meat has been removed from the shell, cooled, and vacuum bagged with some butter. It's only partially cooked at this point, so it can be more or less treated like raw meat. Must be kept in the refrigerator.


Prepare the Lobster Cream - This photo is skipping waaaayyyy to the end of this process. Let's see, make a stock out of the chopped up lobster bodies, strain it, reduce it by half, add cream, reduce it by half again, and strain again. Cool and pack in a microwaveable (is that a word?) cotainer. This is about a 2 hour process, but the taste was, well, I can't think of a superlative that is strong enough to convey how good it really was. Just incredible.


Par-Cook the Orzo - Boil orzo in salted water, but remove while still crunchy. Rinse under cold water and drain. Pack in a microwaveable container. Keeping the orzo crunchy here will ensure that it does not turn to mush when reheated later.

Pack the Supply Kit - Lobster meat in vac bag, lobster cream, orzo, mascarpone cheese, pea shoots, meyer lemon zest, salt, and olive oil. Bring to office and place in refrigerator until service time.

When the time comes, find a space to set up your meez. This may be tough, especially in the middle of the lunch rush.

French Press Sous Vide Lobster - Since the lobster meat is already partially cooked, it only needs to be warmed through. I mixed boiling and tap water until I thought it felt right (about 120-130F, if I had to guess), dropped the vacuum bag in, and lowered the plunger to keep it submerged. I refreshed the water mix after the butter had melted and let it sit for a few minutes while prepping the other components.


Final Prep - Make the pea shoot salad. Combine the pea shoot greens (cut off excessively long stems), some salt, and the lemon zest. Dress with olive oil. Next, microwave the lobster cream and orzo to heat up. Stir together and add in the mascarpone. By the time this is done, the lobster should be heated through.

Plate Dish - Place a mound of the orzo mixture in the center of a the plate. Remove lobster from bag and place on top of orzo, tail first, then claw on top. Top with pea shoot salad.


At the risk of blowing my own horn, this was a spectacular success. The lobster was beautifully tender and flavorful, and that orzo... Makes me want to cry just thinking about it. Happy tears, of course. Not only did I win rave compliments from my colleague (actual quote "this might be the best meal I've ever eaten"), but I also managed to create quite the scene in the bustling cafeteria. No doubt people will be talking about this day for some time!

Now for some dessert. How about, ho hum... French Laundry donuts?

These better be good, since the dough takes a couple of days to make. The moisture in the dough is primarily egg yolks, so it has a nice richness to it.


These look fantastic, and they tasted even better. This is really bordering on ridiculous now. Just incredible. The beauty of these is that they freeze well, and taste freshly made after reheating in a toaster. Just use the bagel toaster in your cafeteria, if you have one.


Just ask yourself - why should you settle for cafeteria slop any longer? With a little know how and some pre-planning, (and the proper motivation, I suppose), you can eat incredibly any day of the week.

Friday, November 02, 2007

Makin' Bacon

Attention vegetarians - STOP READING THIS POST!!!!

Danger lies ahead. Not like many veg-heads are probably lurking on a blog with this title, but in all fairness, I have to offer a warning that today's subject matter may - well, might just cause you to question the validity of your own existance, or at the very least, induce a debilitating feeling of jealousy. And I just can't be responsible for that.

For the rest of us, we are talking, of course, about the great elixir of life - bacon.

Recently I bought Michael Ruhlman's book Charcuterie, a brilliant guide for the home cook - turned meat man. This well crafted collection of principles and techniques is a veritable encyclopedia of meat artistry. Techniques like salt curing, sausage making, confit are all in there, as well as a vital explaination of food safety concerns and how to avoid them. If you are at all interested in trying your hand at these time honored techniques, I can't reccomend this book enough. Although there are some complex and time consuming projects, there are plenty of relativly straightforward items to get you started. This was precicely the information I needed to take my meat game from foolish novice to... um, slightly less foolish novice.

Bacon caught my eye, as it doesn't require any special aging environment (still waiting for the basement to cool for the winter season). It's also still warm enough to justify standing outside for a few hours to babysit the smoker. Plus, who doesn't like bacon? There is a lot of time involved, but most of it is just waiting. It's acutally not too hard to make. Simply get a slab of pork belly, apply a cure, store in the fridge for a week, rinse and dry, smoke the cured belly (now called fresh bacon), and eat. See? Simple. The cure has some flexibility in the flavor department (maple syrup? black pepper? molasses?), but the elements of salt, curing salt, and brown sugar are essential to ensure safety and balance of flavor.

So after all this trouble, you ask, was it worth it? As my Scottish friend would say, it was the dog's bollocks!!! Rich with bacon-y goodness, it posessed a depth of flavor that is lacking in typical commercial bacon. Already, I'm thinking about my next batch once the 5 lbs I made are gone. At this rate, it might be just a couple of weeks away! I don't have to tell you, but the eating options are limitless. In the past week alone, I've used my bacon for:

- plain old bacon strips
- cobb salad
- chicken club sandwich (avocado makes this perfect)
- bacon and shrimp chowder
- and of course, the classic BLT

Let the photo essay begin!


Fresh pork belly, 5lbs - I used organic meat from a trusted supplier. Hey, if you're going through all the trouble of making your own bacon, the least you can do is start with the best possible meat.


Applying the cure. Special thanks to my daughter Elisabeth. Making homemade bacon at 2 years old... I'm so proud!


The cure is applied and rubbed in. Now the waiting starts.


7 days later... The curing is complete. Cure has been washed off and meat placed on an elevated rack to dry. A tacky, dry skin is called a pellicle, and is critical in order for the meat to absorb the smoke flavor.


Smoking in my cheap smoker. Hey - it gets the job done. I used cherry wood (happened to have on hand) and placed a pan of apple cider inside. I tried to maintain the temp at about 125. The bacon smoked for about 4 hours.


Out of the smoker. Looking good...


Ohhhhhhhhh... Aaaahhhhh. Excuse me. I just had a moment.


After baking in the oven (400 deg, about 10 minutes).


With this bacon, a BLT has never been better. Don't mess with a classic - bacon, crisp lettuce, fresh tomato, mayo, and, of course, decent bread.

Wednesday, October 31, 2007

Duck Sous Vide - A Cooking Experiment

Sous Vide is not exactly a new cooking technique, but it is almost completely unknown in the home kitchen. It's scientific nature, not to mention the high startup cost for equipment, has largely relegated it's use to high end restaurant kitchens. But after watching this season of Top Chef where the winner, Hung, made liberal use of this technique, I was determined to give it a try.

In sous vide cooking, the raw items (usually some sort of protein) are placed in a plastic bag which is then vacuum sealed to remove all air and create a watertight seal. The bag is then placed in a water bath, heated to some precise temperature, and left for an amount of time chosen specifically to acheive some particular effect. Sounds complicated, but check out this example and you'll see how simple it really is.

Suppose you would like to cook a steak to a perfect medium rare (135 deg F internal temperature). Using traditional cooking methods, it can be tricky to know just when to take the meat off the heat. Too soon, and the steak will still be speaking to you. Too long, and you will be enjoying(?) a nice plate of sawdust. Even if you monitor the internal temperature, there is still carryover to worry about. Now instead, if you placed the steak in a vacuum sealed bag, heated a water bath to exactly 135 degrees, and placed the steak bag inside, in about 30 minutes, the steak will reach equilibrium with the water - that is to say that the entire piece of steak will be at 135 degrees. What's more, is that if you were to leave the steak in the water bath for an additional 30 minutes, the temperature would not increase at all! Thus, you will have a perfectly uniform piece of steak, cooked perfectly to medium rare throughout. And since the steak has not been subjected to harsh heat, the protein fibers will not tighten up and expel their moisture - meaning a more tender and juicy piece of meat. This is but one basic application of sous vide.

The tricky part is to keep the water bath at precisely the desired temperature. In some advanced sous vide techniques, a difference of even 1 degree could completely change the outcome. This is largely where the expensive startup costs come from. Some companies are now making dedicated equipment to manage the water temp (like Cuisine Technology's Thermal Immersion Circulators). At over $900, they are out of reach for the average home cook, but are fantastic gadgets nonetheless.

Vacuum sealers can be another money pit. Professional quality units are in the 4-figure range. Many on various internet forums have reported good results using the Food Saver (for about $100). Although sous vide is French for "under vacuum," the term is a little misleading. Yes, the food is packed in a vacuum sealed bag. But, the cooking itself does not take place in a vacuum.

Fortunately, I don't believe that you don't need any of this equipment to give sous vide a try. We can get around the need for a sophisticad circulator by using a large stockpot full of water. Since water has a high thermal mass, once you've stabilized the temperature at your chosen set-point, it should hold pretty steady for the amount of cooking time needed. A variation of a few degrees up or down won't hurt us if we're doing some basic sous vide cookery. And zip locking freezer bags sound like a poor man's substitue for a vacuum sealer to me.

So here's what you will need:

- large stock pot (the bigger the better)
- thermometer, with range down to 100F
- zip locking freezer bags
- plastic wrap
- stove (in this case, electric is preferable to gas, but whatever)

Before we get started, there are a few things we should keep in mind.

1. The temperature of the water bath will drop a few degrees when the protein is first added, since it will be coming directly out of the refrigerator. Plan for this by starting with a slightly higher water bath temp than the desired finishing temp.
2. Since the protein will not be exposed to high heat, it will not have a tasty brown crust on the outside. This can be fixed by quickly searing the meat on high heat once the sous vide cooking process is finished. But be careful - you've invested all this time and effort to bring your protein to the perfect doneness, so don't leave it on the heat for too long and foil this effort. A little oil and 30 seconds max heat exposure should do just fine.
3. If the water temp goes up too high - add cold water to correct. Likewise, you could add hot water if you need to quickly raise the temp.
4. It's a good idea to wrap your protein tightly in plastic wrap before placing in the freezer bag. This way, when you suck the air out of the bag and seal it, the plastic wrap will prevent you from inhaling raw meat juices - yuck! It's important to get as much air out of the bag as possible. Any residual air will cause the bag to float, and will not allow the protein to be in continuous contact with the water.
5. Use freezer bags, or something thicker, otherwise the bag may not be able to stand up to the heat. Also, it's best to stay away from the bags with the sliding zippers. They may close easier, but they are also prone to leaking.
6. It's also a good idea to stir the water frequently to prevent hot or cold spots.
7. Adding aromatics to the bag will perfume the protein as it cooks. But be careful of adding liquids as it makes it difficult to seal the bag properly.
8. I have to add that using this technique can be a strange experience for the senses. There are no sounds, no smells, and you are cooking meat in a water bath that you can safely plunge your hand into. It's just an odd feeling.

Got all that? Okay, let's roll.

Duck Breast Sous Vide

1 duck breast, skin removed and reserved
3 slices orange peel, julienned (skin only, no white part)
Fresh ginger, several paper thin slices
Salt and pepper

For the sauce
2 T Grand Marnier
1 C orange juice
1 C duck or chicken stock
1 t finely grated orange zest
2 T butter

Prepare the water bath by filling stockpot and heating the water to 145F. Mount the thermometer on the inside of the stock pot, so that you can continuously monitor the water temperature. Adjust the burner power so that the water temp is stabilized (for my stove, it was on 25% power - about medium low).

Season the duck breast with salt and pepper. Place on a sheet of plastic wrap and sprinkle top and bottom with orange peel and ginger. Wrap tightly in plastic wrap. Place wrapped duck into a freezer bag. Suck out as much air as you possibly can and seal the bag.

Place bag in stockpot and let cook for 30 minutes, maintaining the water temp at 140F. Stir pot periodically to ensure that there are no hot spots. Also make sure that the protein is completely submerged.


While duck is cooking, score the reserved skin and bake in the oven at 375, until the fat is rendered out and the skin crisps up like bacon. Set crispy skin aside until ready to serve.

When duck is cooked, remove from bag and discard orange peel and ginger. Adding a little oil to a hot skillet, sear on high heat about 30 seconds per side to brown the outside of the meat. Remove meat from pan.

Out of the water bath and removed from the bag.


After searing and slicing. Notice the color of the meat is uniform throughout.


To make the sauce, deglaze pan with Grand Marnier and reduce till almost completely evaporated. Add orange juice and zest and reduce until it becomes thick and syrupy. Add stock and reduce by half. Remove from heat and whisk in butter.

Slice duck thinly on a bias and serve with the orange sauce and skin cracklin.

Now that's a beautiful piece of meat. Not only was the meat cooked perfectly medium (hence the pink color), but the texture was like beef tenderloin. It was the most tender piece of duck meat I have ever eaten. For this plate, I threw in some potatoes cooked in duck fat, as well as some twice-cooked green beans.

Thursday, June 21, 2007

Maki Time

A funny thing happened today - my lovely wife, Hollis, decided out of the blue to face her darkest fears and give sushi a chance. Maybe being pregnant is messing with her head, but a sushiofile (is that a real word?) like myself was not about to let a chance like this slip through the cracks.

Sushi is often misunderstood, so I would like to clear a few things up before we get started here:

1. Sushi is sushi because of the vinegar seasoned rice, not because of raw fish or anything else. In fact, some sushi items contain no fish at all!
2. There are many different types (styles) of sushi: nigiri, maki, temaki, inari, chirashi, and oshi-zushi - just to name a few. Nigiri and maki are perhaps the most well known in the western world.
3. The toppings or fillings can be fish, meat, vegetables, eggs, etc. and could be raw, cooked, blanched, seared, marinated, cured, or any other such preparation.
4. Sushi chefs are supposed to season each piece with wasabi themselves, so you shouldn't have to.
5. Dipping sushi rice in soy sauce is simply not cool. Not only would the rice fall apart, but it would absorb so much soy that other flavors would be completely overwhelmed. The soy sauce should be used in moderation to season the topping only. Properly made nigiri sushi can be turned upside down to dip the topping in soy sauce without having it fall off.

Okay, I feel better now!

I've made sushi a few times now, with mixed results. Believe it or not, the hardest thing to get right is the rice. Texture and seasoning are such a critical part of the final product, yet typically receive little thought on this side of the ocean. The toppings are the easy part, provided you have a good supplier of fish that you trust and a quality Japanese market nearby. The act of forming the individual sushi pieces can also be difficult, so it's best to stick to something simple at first. For this reason, I decided to go with maki.

Now what to fill them with... Raw items were out of the question (and probably not gonna happen anyways, even with Hollis in such an altered state of mind), so I thought we'd play it safe: cooked shrimp and veggies.


Shrimp Tempura Roll with Spicy Mayo

For each roll:

3 shrimp, fried tempura style and cooled (use a wooden stick while frying to keep shrimp from curling)
A few sticks of cucumber, julienned
1T spicy mayo (I use 2 parts mayo, 1 part chile garlic sauce to make mine)
Green onions, finely sliced

Prepared sushi rice


Cucumber Roll with Chive Cream Cheese

For each roll:

A few sticks of cucumber, julienned

2T cream cheese
1T chives, finely chopped
Prepared sushi rice


Let's start with the shrimp roll. There's quite a lot going into this one, so I decided to do an inside out roll, which allows a little more room on the inside for stuff. Using wet hands, take a tennis ball sized handful of sushi rice and evenly distribute over a half sheet of toasted nori. This might take some practice, and you'll probably end up with sticky rice stubbornly sticking to your fingers. Try not to have a conniption. When that's taken care of, sprinkle the top with toasted sesame seeds, or tobiko (flying fish roe) if you can find it.


Turn nori upside down and place onto a bamboo rolling mat, protected with a sheet of plastic wrap. Put fillings inside, being careful not to overfill. Try to keep all like items close together. It will make the roll look better when you slice it.


Roll nori tightly over toppings, being sure to leave about a half inch or so of nori visible (this is key).

Using the bamboo mat, continue to roll, making sure the end overlaps a bit. Use the mat to gently squeeze the roll so that it holds together.


Repeat for the cucumber, but this time keeping the nori on the outside. This time, make sure to leave a half inch of nori exposed at the top. I know, I know - terrible job of grouping the cucumber sticks together in the roll, not to mention that the pieces are not uniformly cut. Amateur moves, what can I say?


Wet the exposed nori with your finger. Roll the maki, making sure that the top edge wraps completely around the fillings. The wet nori edge should stick to the roll as you apply light pressure with the mat. If you like, you can use the mat to shape your roll (circle, square, etc).


Here's a useful tip - make sure you use a really sharp knife and dip it in water before slicing. This helps prevent the sticky rice from sticking to the blade and ripping the roll apart as you slice. It would be a shame to mess up all your hard work at this point.


Not quite up to the standards of Japanese presentation, is it? But you would eat that... Right???

I have to admit that I didn't care for the cucumber roll. The cream cheese was a little too soft, and just didn't tast like it belonged with the rice. I patterned it after the classic English tea sandwich (which Hollis loves). It was a good idea on paper, but didn't really seem to work.

The shrimp rolls on the other hand were outstanding. I would have been quite happy paying for those at a sushi bar somewhere. Although next time I make it, I will probably throw in some avocado. Love that stuff. This roll would also work really well with some nice raw tuna. That's the beauty of homemade sushi - the opportunities for creativity are endless.

Hopefully, making your own maki provides you with a great deal of satisfaction. A trained sushi chef could probably throw this roll together (and slice and plate it) in about 30 seconds, so don't bother timing yourself if you decide to give it a go - just do it for the fun. Sushi may be intimidating, but with a little practice, it can be conquered, if not mastered.

Saturday, April 14, 2007

2 Sure Signs of Spring

Crocuses blooming in the yard...

and breaking out the grill to smoke some pork shoulder.

Tuesday, February 27, 2007

Chilean Sea Bass - A Valentine's Treat

Due to the big snowstorm we were expecting, Hollis and I decided to stay home for V-Day this year. I decided to prepare something special for dinner, and make it an extraordinary evening nonetheless. Here was the menu I came up with:


Gruyere & Australian Jack Cheese Fondue - Baguette

Salad of Mesculin Greens - Toasted Goat Cheese Round - Dried Cranberries - Red Wine Vinaigrette

Pan Roasted Chilean Sea Bass - Bacon Powder - Meyer Lemon Beurre Blanc - Sweet Potato Puree - Parmesan Crisps

Domori Dark Chocolate - Beppe Marino Piemonte Brachetto "Bramusa"


I have to be straight with you - I have a thing for sea bass (don't be a hater, I buy MSC certified). I didn't know this until recently, "Chilean Sea Bass" is a marketing friendly name for what is really the Patagonian Toothfish. Somehow that just doesn't roll off the tongue, does it? Call it whatever you want - this fish is dang tasty. Here's the technique for the main dish, which I would highly recommend if you do sea creatures. Feel free to substitute a different fish if you like - salmon or halibut would work particularly well. But sea bass rocks.


Pan Seared Chilean Sea Bass
Serves 2


2 6oz fillets Chilean Sea Bass
1 pc bacon, cooked crispy and pulverized
Sea salt

For the Beurre Blanc:
1 small shallot, finely diced
3 T dry Vermouth
2 T white wine vinegar
Juice of 1/2 Meyer lemon
1/2 c butter

For the Sweet Potato Puree:
1 decent size sweet potato
Cinnamon, a few shakes
Nutmeg, fresh grated
1 T Brown sugar

Butter
Parmigiano Reggiano or Grana cheese


Brush fish with a little olive oil, season with salt, and sear in a hot nonstick pan. Flip over when a nice golden crust has formed (about 4-5 minutes). Continue cooking for another 5-6 minutes or so. Fish should be just barely cooked through the center (medium). Place fish on a generous reservoir of beurre blanc and sprinkle with bacon dust.

For the Beurre Blanc: Simmer shallots, vinegar, vermouth, and lemon juice over medium heat until the liquid is reduced almost to nothing. Remove pan from heat and add butter in small increments to the pan while whisking continuously, until all is added. Mixture should thicken slightly as butter is added. Make sure each addition of butter is completely incorporated before adding more.

For Sweet Potato Puree: Roast sweet potato at 400 degrees for about an hour - or do what I do and microwave it for 6 minutes. Scoop out insides and mash. Add cinnamon, nutmeg, brown sugar, and butter and stir vigorously.

For Parmesan Crisps: Pile 1 T sized mounds of grated parm every 6" on a baking sheet lined with parchment paper. Place in 400 degree oven until cheese melts and starts to bubble, about 3 minutes. Take care not to burn the cheese - this tastes really bad.

Thursday, December 07, 2006

Porcini - The King of Fungus


The other day I was out food shopping, when I spotted a rare item not usually found adorning grocery store shelves. I had seen the dried variety before (and cooked with them several times), but this was my first face to face encounter with fresh Porcini mushrooms. If you know me at all, then you know that this meant a challenge - one that I would have to accept.

Porcini go by many other names, but the latin name Boletus Edulis tells the story (Boletus means superior mushroom). These fungi are highly regarded in many parts of the world, most notably in Italy.

I sifted through the bin and grabbed a couple of decent looking specimens. Some looked like they were a bit past their prime, but most would be just fine if used right away. I wasn't about to let my produce-pickiness get in the way of taking some of these babies home.


Ladies and gents - the king has entered the building.


A cross-section of this one reveales that familiar porcini shape.

I prefer to take a simple approach when deciding how to prepare an ingredient like this. Really this is key when it comes to cooking - when you have a great ingredient, let it be the star of the dish. I really wanted to taste the Porcini - not overpower it with other strong flavors. I decided to keep it pretty simple, sauteeing the porcini in olive oil, adding some pasta, and topping it off with a little Parmigiano Reggiano. Simple, but perfect. I wrote up the technique for you to try at the bottom of the post.

Having used dried porcini on a number of occasions, I was really curious how the fresh ones would compare. I didn't have to wait long to find out - when the mushrooms first hit the hot oil, this incredible aroma was released. It was not the familiar earthy smell of the dried porcini, but something much more delicate and intriguing.


Oh yeah - sizzle for me baby! Hit me with that aroma!


The mushrooms were absorbing the oil and turning a nice golden color. When the pasta was ready, I tossed in the sautee and some Parmigiano. Time to taste.

Flavor wise, the fresh porcini had the same general taste as the dried ones. However, I think the earthiness tends to be a little more concentrated in dried form - I prefered the mellowness of the fresh variety. Also, the texture of the fresh was softer and meatier - also a plus. But the biggest difference I noticed was in the aroma. Each forkfull that ascended to my face brought this permeating wave of olfactory sensation, reminding me of the captivating scent of the mushroom's cousin - truffles. This aspect alone makes fresh porcini the hands down winners.

As I mentioned already, finding these in your local market may be tough. But if you dig mushrooms, searching these out is well worth the effort.


Pasta with Porcini and Parmigiano


For each person:

1/4 lb spaghettini
1/4 lb fresh porcini mushrooms, sliced thinly
1 clove of garlic, finely chopped
olive oil
Parmigiano Reggiano cheese
salt


Generously salt pasta water and bring to a boil. Heat about 1/4c of olive oil over medium heat. When the oil is hot, add the porcini and give them a quick toss in the pan. At this time, also add the pasta to the boiling water. The pasta should take about 7-8 minutes - remember, pasta never waits for it's toppings!

Give the mushrooms a toss every couple of minutes. They should start to become slightly golden. For the last minute of the sautee, add the garlic.

When the pasta is done (al dente), drain and add to the mushroom pan. Toss to coat pasta in the oil, adding more if necessary. Grate plenty of Parmigiano on top and server right away.


Notes: You can use dried porcini if fresh aren't available. Simply reconstitute them with some hot water and let them steep for 10 minutes or so. Then use them like the fresh ones.

This works well with other mushrooms too. I would stay away from the common white button mushrooms for this dish though - the mushroominess (nice word, huh?) is just a little too strong for my taste here.

I think tagliatelle or pappardelle would have been better choices for the pasta, but I didn't have any in the house. Oh well.

Thursday, October 05, 2006

Naked Nite @ TND

"No Way! It's not me, it's the food!"
- Jamie Oliver

Thursday Night Dinner (TND) has become an institution at the home of my good friends here in central MA. Each Thursday, they host family, friends, and neighbors at their home for a great meal and fun evening. A throwback from simpler times, TND gives us all the chance to get together, talk, laugh, and catch up on the week's happenings. With somewhere around 20 regulars and another 20 or so who stop by once in a while, it is always a full house - literally.

Recently, I teamed up with fellow TND regular Emilie to host what I called 'Naked Nite'. Okay, okay, get your mind out of the gutter! This was not a clothing optional evening. No birthday suits or skinny dipping. Only two visible cheeks allowed per person (above the waist, please). No, this was a celebration of self labeled "Naked Chef" Jamie Oliver's simple and delicious food. I know what some of you food snobs out there are thinking, but listen - Jamie's food is both easy to make and tastes fantastic. It is exactly the kind of food I enjoy making, and we all enjoy eating.

The 'Naked' monniker comes from the idea that Jamie's food is simple. The techniques he uses are 'stripped down' from the complicated restaurant methods so that anyone can make this food at home. The recipes are reduced to the 'bare essentials.'

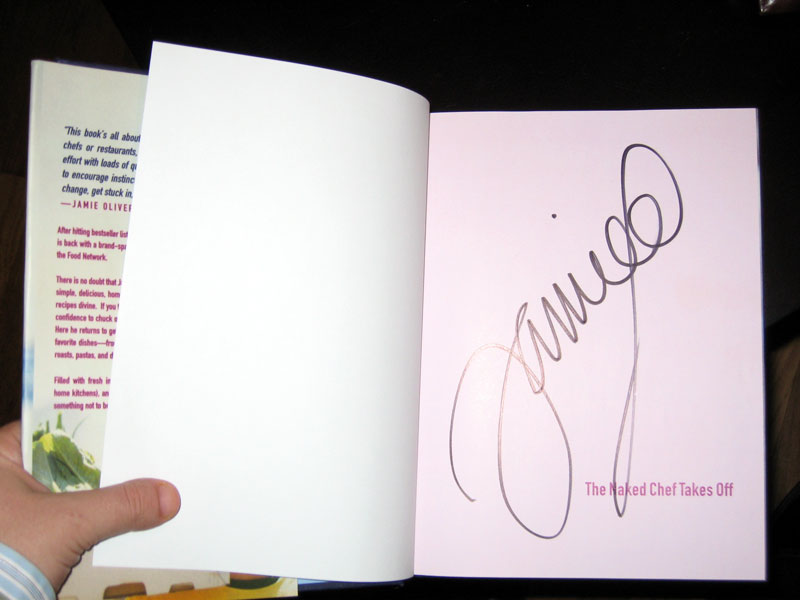
I had the opportunity of meeting Jamie a few years ago while he was passing through Coral Gables on a book signing tour. But before the signing, there was a live cooking demo. In the bookstore courtyard, a couple hundred chairs were set in front of a touring cooking stage. Jamie came out, and wasted no time getting started. He mentioned that he was often asked if he cooks in the nude at home. He answered, in his typical Brit accent, "I don't reccomend that you actually cook naked. Aside from the whole hygene thing, you might burn yourself!" Yikes! I'll keep that in mind. **Fighting the urge to make the obvious inappropriate 'sausage' joke here**


Nice to meet you Jamie. Thanks for keeping your kit on.


Jamie's live performance was every bit as entertaining as I expected it to be. For his lamb curry dish, he put his cooking method to music, even stopping one point to play the drums while the tantalizing scent of sauteeing lamb and curry spice wafted through the courtyard. He prepared a dish with couscous and grilled veggies, his "Easiest, Sexiest Salad Ever" (a fantastic combo of fresh figs, mozzarella, and prosciutto - still one of my all time favorites), and finished up with a simple dish of cut pineapple with bashed up mint and sugar tossed on top. Not bad for a free show!

I left that night with some new ideas to try out, and a free box of couscous - which I still have to this day. Good thing pasta doesn't spoil.

So with this inspiration in mind, we sifted through his various books and websites, and chose the evening's menu:

World's Best Baked Onions
Summer Chickpea Salad
Baked Carrots with Cumin, Thyme, Butter and Chardonnay
Risotto with Goat Cheese and Prosciutto
Fantastic Roasted Chicken
Pukka Pineapple with Bashed-up Mint Sugar
Orange and Polenta Biscuits


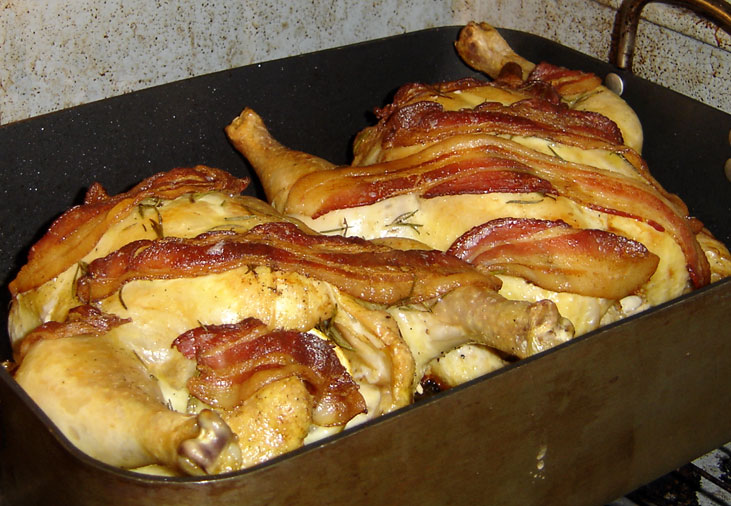
With about 25 guests expected, we had a lot of cooking to do. Taking various ideas I had seen Jamie use, I prepared the chicken with chopped rosemary and strips of bacon draped over the top. The cavity was stuffed with lemon halves and some fresh herbs. The key to a perfect roasted chicken is simple - give it time. At 400F, expect a 4lb chicken to take at least an hour and 20 minutes. Let that outer skin get golden brown and crispy before you take that bird out, or else you'll be sorry. It would be like grabbing your clothes out of the dryer while they're still wet. Sure, you can wear them but...

Not quite there yet. Don't touch that chicken!


Getting naked in the kitchen... sort of.


While the chiken was cooking, I started to work on the risotto while Emilie made the onions. The combo of roasted onion with bacon, rosemary, and Parmigiano Reggiano totally earns the "World's Best" title. Some of the other dishes we made ahead of time, and others still were brought by gracious volunteers. This worked out pretty well, as we were easily able to pull together the entire dinner in about an hour and a half.


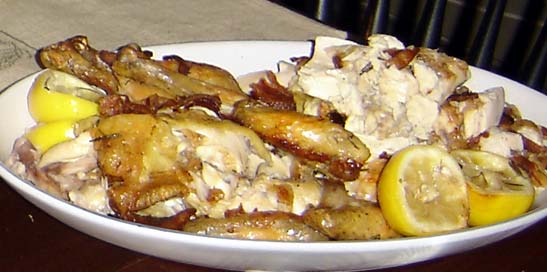
That is some 'pukka' poultry


Carrots, onions, and risotto


This chickpea salad is simply brilliant


Pineapple and polenta biscuits - just lovely


Dinner was served, and our labor of love was soon devoured. I think everyone really enjoyed the meal, which, let's face it, is the entire point. So, cheers Jamie, and thanks for the inspiration! I'm pretty sure there's a Naked Nite II in my future sometime soon.